
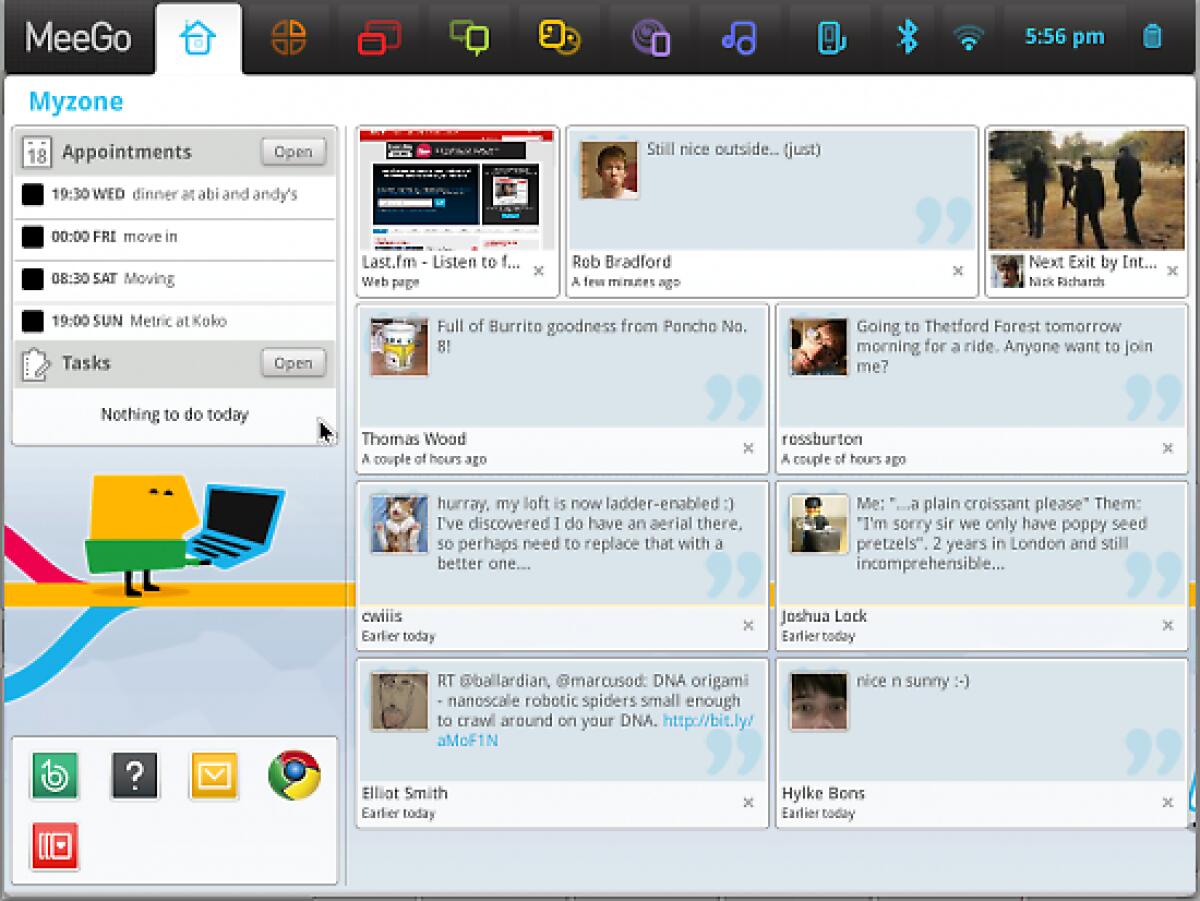
Guida: installare Meego 1.0 su Netbook – How to install MeeGo on your Netbook
Finalmente, dopo due giorni di ricerche, sono riuscito a trovare un metodo semplice e rapido per installare meego sul mio Eee 1005HA.Ecco a voi, dunque, le istruzioni da seguire per installare questo...
 Riccardo Conti

Finalmente, dopo due giorni di ricerche, sono riuscito a trovare un metodo semplice e rapido per installare meego sul mio Eee 1005HA.
Ecco a voi, dunque, le istruzioni da seguire per installare questo sistema operativo sul vostro netbook.
Prima di tutto, una breve premessa: questa versione di MeeGo è stata sviluppata per essere avviata da chiavetta USB. Sarà comunque possibile installarla sul netbook, a patto che abbiate una partizione dedicata sul disco fisso. Io vi consiglio comunque di limitarvi, almeno all’inizio, alla prova da USB, in quanto in questo modo potrete provare questo OS senza perdere nemmeno un documento salvato sul vostro netbook.

Detto questo, iniziamo.
Scaricate l’immagine del sistema operativo da QUI (circa 800MB).
Salvatela sul desktop.
Ora seguite queste istruzioni, differenziate in base al sistema operativo che state utilizzando. Io ho provato e tradotto solo la versione Windows, le guide per Mac e Linux sono rimaste in versione originale.
VERSIONE ITALIANA
Durante l’operazione, perderete tutti i dati salvati sulla vostra chiavetta USB, quindi se avete documenti importanti salvati su di essa, fatevi un backup.
Windows:

Non inserite la chiavetta USB nel pc finchè non ve lo indicherò.
Scaricate QUESTO SOFTWARE ed estraetelo sul desktop.
Avviate il programma appena installato ed inserite la chiavetta USB nel pc.
Selezionate l’immagine di MeeGo appena scaricata (in formato .img).
Inserite la chiavetta USB.
Selezionate come destinazione la vostra chiavetta USB.
Cliccate sul pulsante “Write” per scrivere l’immagine ed attendete che il procedimento sia completato.

Cliccate su “Yes” quando vedrete questa domanda.
Nel mio caso il procedimento ha richiesto un paio di minuti.
Quando avrete completato il procedimento, inserite la USB nel netbook e, dalle impostazioni del Bios, impostate l’avvio automatico da chiavetta USB anzichè dal disco fisso. Ogni netbook ha un procedimento diverso per accedere al Bios o per selezionare l’unità da cui avviarsi, solitamente si utilizza uno dei tasti funzione.
In questo modo il pc si avvierà da chiavetta e potrete scoprire tutte le funzionalità di MeeGo.

Una volta che vi sarete stancati di usare questo OS, non dovrete fare altro che riavviare il netbook, ripristinare il normale avvio e togliere la chiavetta USB.
Buon divertimento.

Per eventuali problemi, date un’occhiata a questa pagina.
ENGLISH VERSION
You will need a USB drive with at least the capacity of the downloaded image.
Note: A byte-exact copy of the image must be placed on the USB drive. It is not sufficient to simply copy the image file to the drive. Be aware contents of the USB drive will be completely erased.
Linux Instructions
Be sure the USB drive is unmounted before proceeding. Some Linux distributions auto mount the USB drive when it is inserted, which can cause corruption when writing.
# umount <usb-drive>
Use either of these two methods:
- Image Writer (recommended, requires Python >=2.4)
Image Writer is a small python executable script that detects your USB drive and writes the image to it. The advantage of using image writer is that it will not inadvertently overwrite your system hard drive. Download Image Writer# cd <directory with downloaded image-writer file>
# chmod a+x ./image-writer
# ./image-writer <image file> - Use 'dd' from the command-line
Caution: 'dd' will overwrite any destination including your system hard disk. Make sure you know the correct value of <usb drive> before proceeding.# dd bs=4096 if=<image file> of=<usb drive>
Proceed to Step 3: Boot the image
Windows Instructions
There is a simple way to put the MeeGo image on a USB drive.
- Download the Win32DiskImager.exe program: https://
launchpad.net/win32-image-writer/+download (zip file) - Unzip the file and extract the contents to a known directory
- Run W32DiskImager.exe (screenshot)
- Select the MeeGo image file (.img)
- Select the drive letter which corresponds to the USB key
- Click the "Write" button to byte-copy the image to the USB drive.
Proceed to Step 3: Boot the image
Mac OS X Instructions
Be sure the USB drive is unmounted before proceeding. OS X auto mounts the USB drive when it is inserted, which can cause corruption when writing. You can press the eject icon in Finder or drag the USB icon to the trash.
Use this method (thanks to Many Ayromlou for the instructions):
- Open a Terminal (Applications -> Utilities -> Terminal)
- Run
diskutil list
to get the current list of devices
- Insert your flash media
- Run
diskutil list
again and determine the device node assigned to your flash media (for example /dev/disk2)
- Run
diskutil unmountDisk /dev/diskN
(replace N with the disk number from the last command; in the previous example, N would be 2)
- Run
sudo dd if=/path/to/downloaded.img of=/dev/diskN bs=1024
(replace /path/to/downloaded.img with the place you downloaded the image. You'll need your password for this.
- Run
diskutil eject /dev/diskN
(where N is the number we found above) and remove your flash media when the command completes
- You're done! Proceed to Step 3: Boot the image
👉 Iscriviti al canale WhatsApp di YourLifeUpdated
Ricevi solo le notizie e le guide più importanti, senza spam.
Hai bisogno di aiuto o consigli rapidi?
💬 Supporto diretto: entra nel gruppo Telegram – CLICCA QUI
👥 In alternativa, unisciti al nostro Gruppo Facebook
🔥 Le migliori offerte tech, ogni giorno
💰 Unisciti al gruppo OFFERTE TECH (oltre 16.000 utenti)
Seleziono solo offerte davvero convenienti per farti risparmiare tempo e denaro.
Seguici anche qui:
📰 Google News o Facebook – per non perdere nessuna novità
🎥 YouTube – recensioni oneste, test e guide pratiche
💡 Vuoi risparmiare su Amazon?
🚀 Prova Amazon Prime gratis oppure
🛒 scopri le migliori offerte Amazon di oggi
